# Kaleido Mods
A few Skywalker Community Mods
# Kaleido HiBean BLE Firmware
# SnowBear Firmware Installation
Kaleido currently uses Classic Bluetooth to talk to HiBean a dated standard that, importantly, isn't supported on iOS at all. This project is a workaround that finally brings Kaleido connectivity to iPhones and iPads. It also pairs nicely with Bear's bridge for connecting devices over BLE Serial, which sidesteps the long-standing issues Classic Bluetooth SPP has on macOS, especially on Apple Silicon. Brought to you by Bear of the Skywalker community, with support from Will\_Z at HiBean.
[](https://skywiki.coffee/uploads/images/gallery/2026-05/hD8image.png)
**Machines Confirmed Kaleido Roasters that work:
M1 Lite
M1 Pro
M2 LEGACY (Unsealed)**
### **Requirements**
**This is still in Beta and code is still being worked on. Please report any issues you have to our Community Discord.**
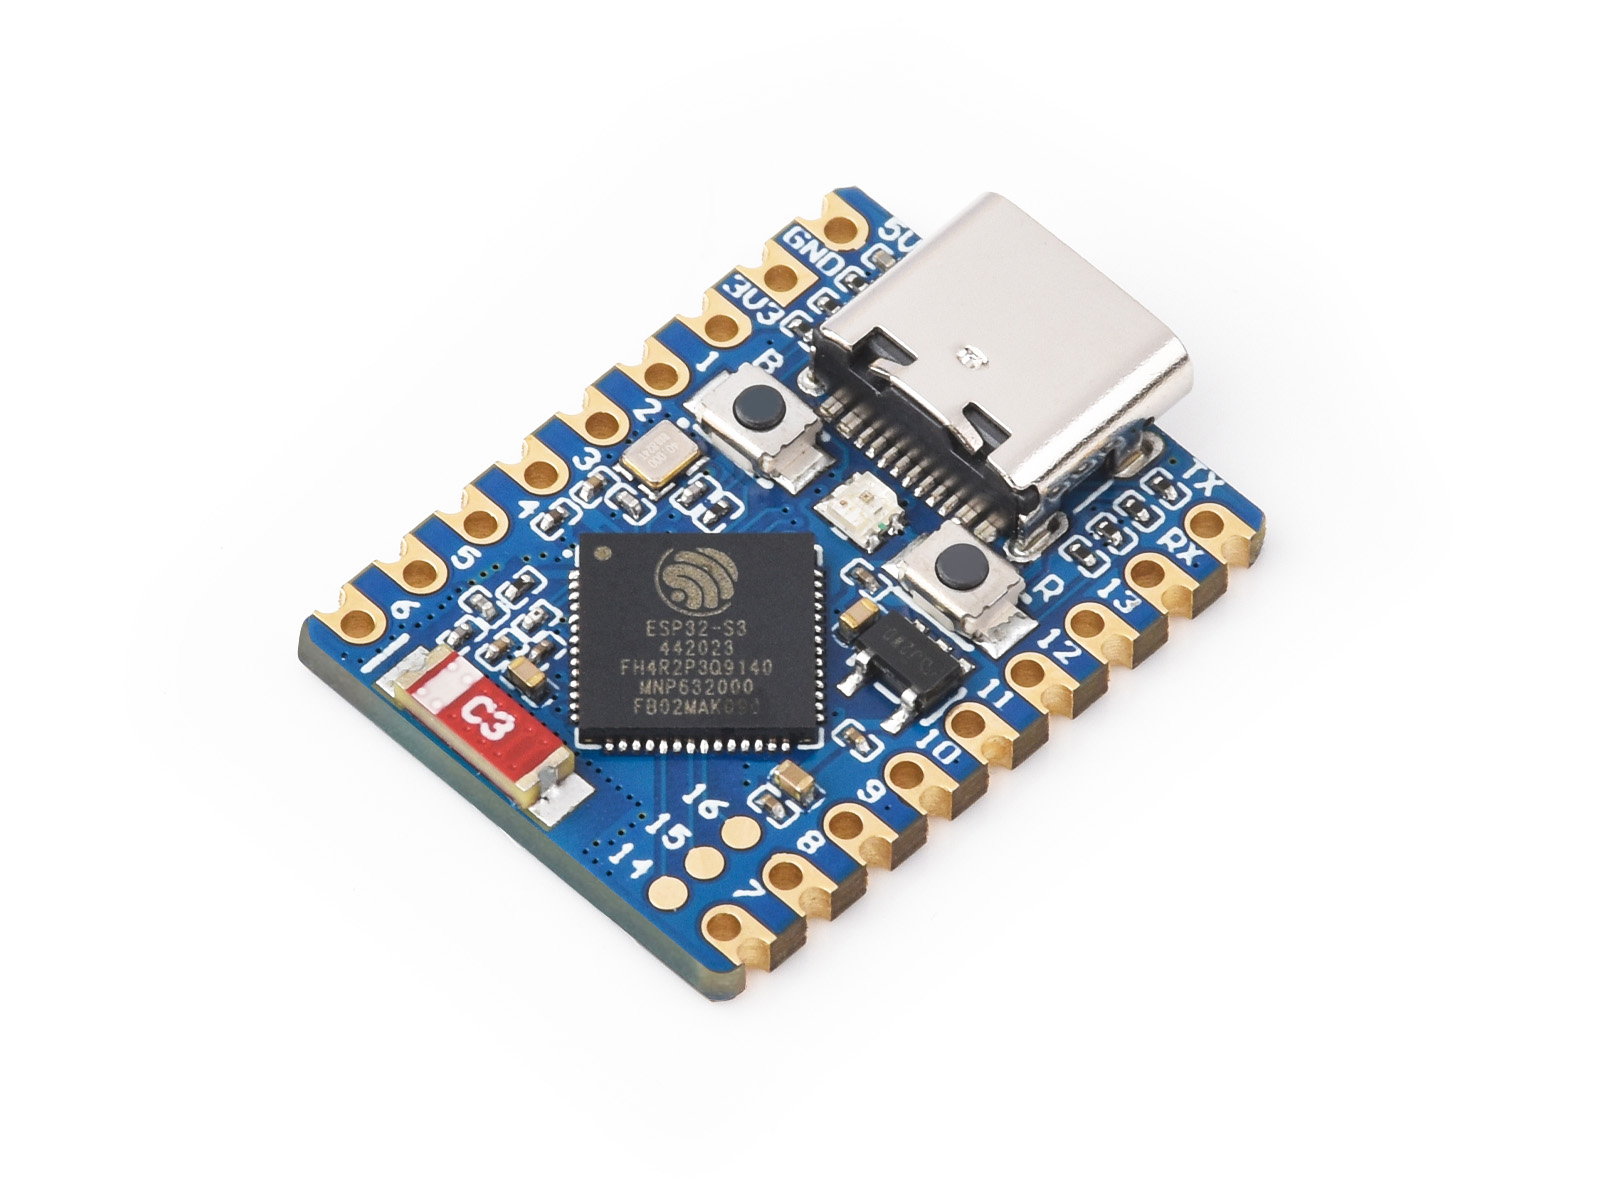
1. [**ESP32-S3**:](https://www.amazon.com/Waveshare-Development-ESP32-S3FH4R2-Dual-Core-Processor/dp/B0CHYHGYRH/?_encoding=UTF8&pd_rd_w=r9sWT&content-id=amzn1.sym.255b3518-6e7f-495c-8611-30a58648072e%3Aamzn1.symc.a68f4ca3-28dc-4388-a2cf-24672c480d8f&pf_rd_p=255b3518-6e7f-495c-8611-30a58648072e&pf_rd_r=5B6XB3S76AN41GG53BPF&pd_rd_wg=jrSyV&pd_rd_r=0c2acad7-cc3f-40c5-8e89-116521cb0165&ref_=pd_hp_d_atf_ci_mcx_mr_ca_hp_atf_d)
Ensure you have the ESP32-S3 board
[](https://skywiki.coffee/uploads/images/gallery/2025-01/9Edimage.png)
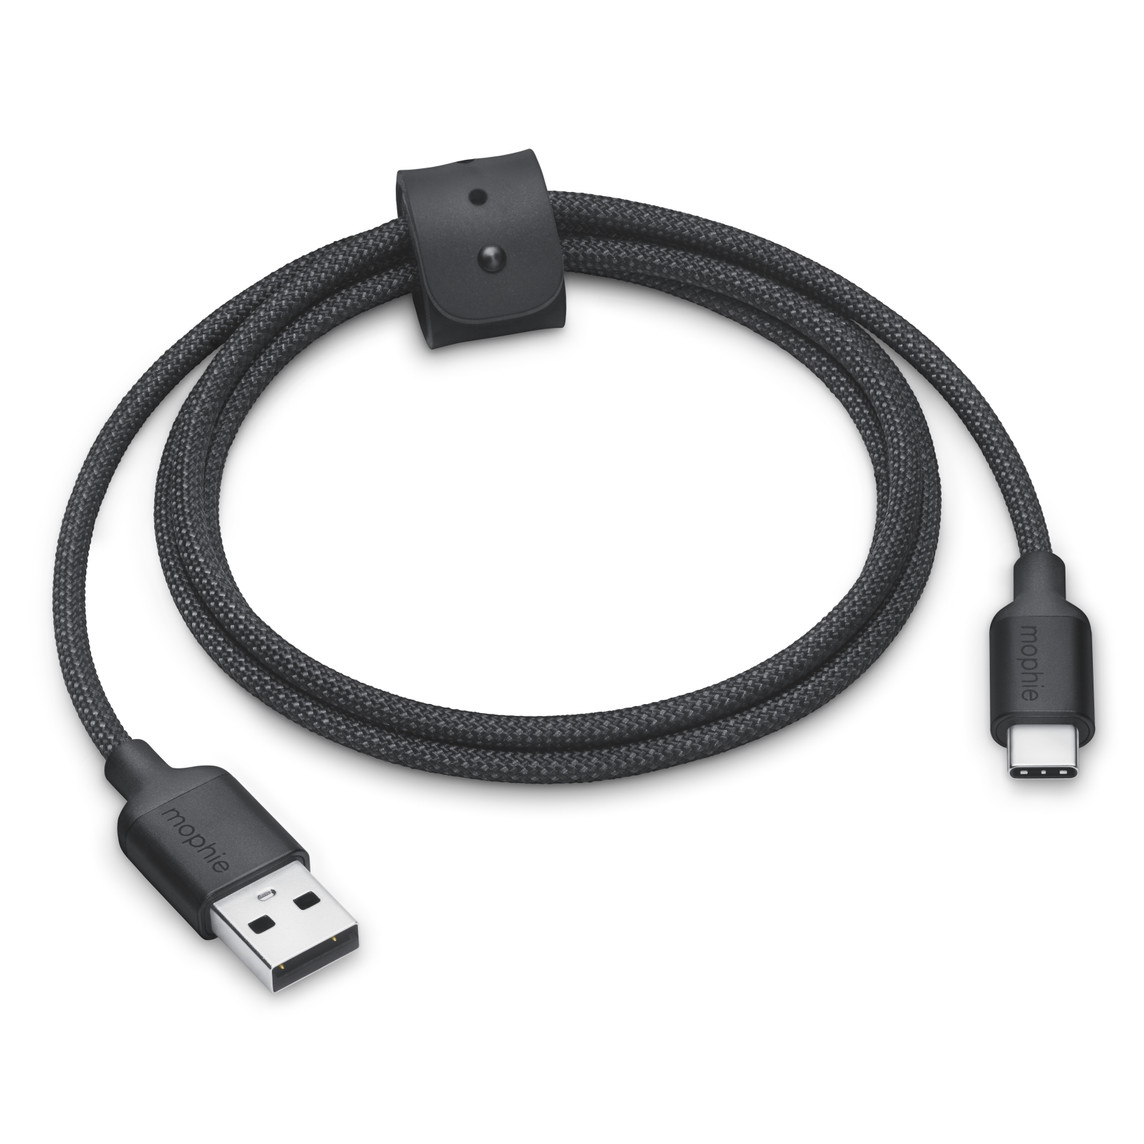
2. USB A Male to USB C Male Cable (UART)
[](https://skywiki.coffee/uploads/images/gallery/2026-06/ifzimage.png)
or
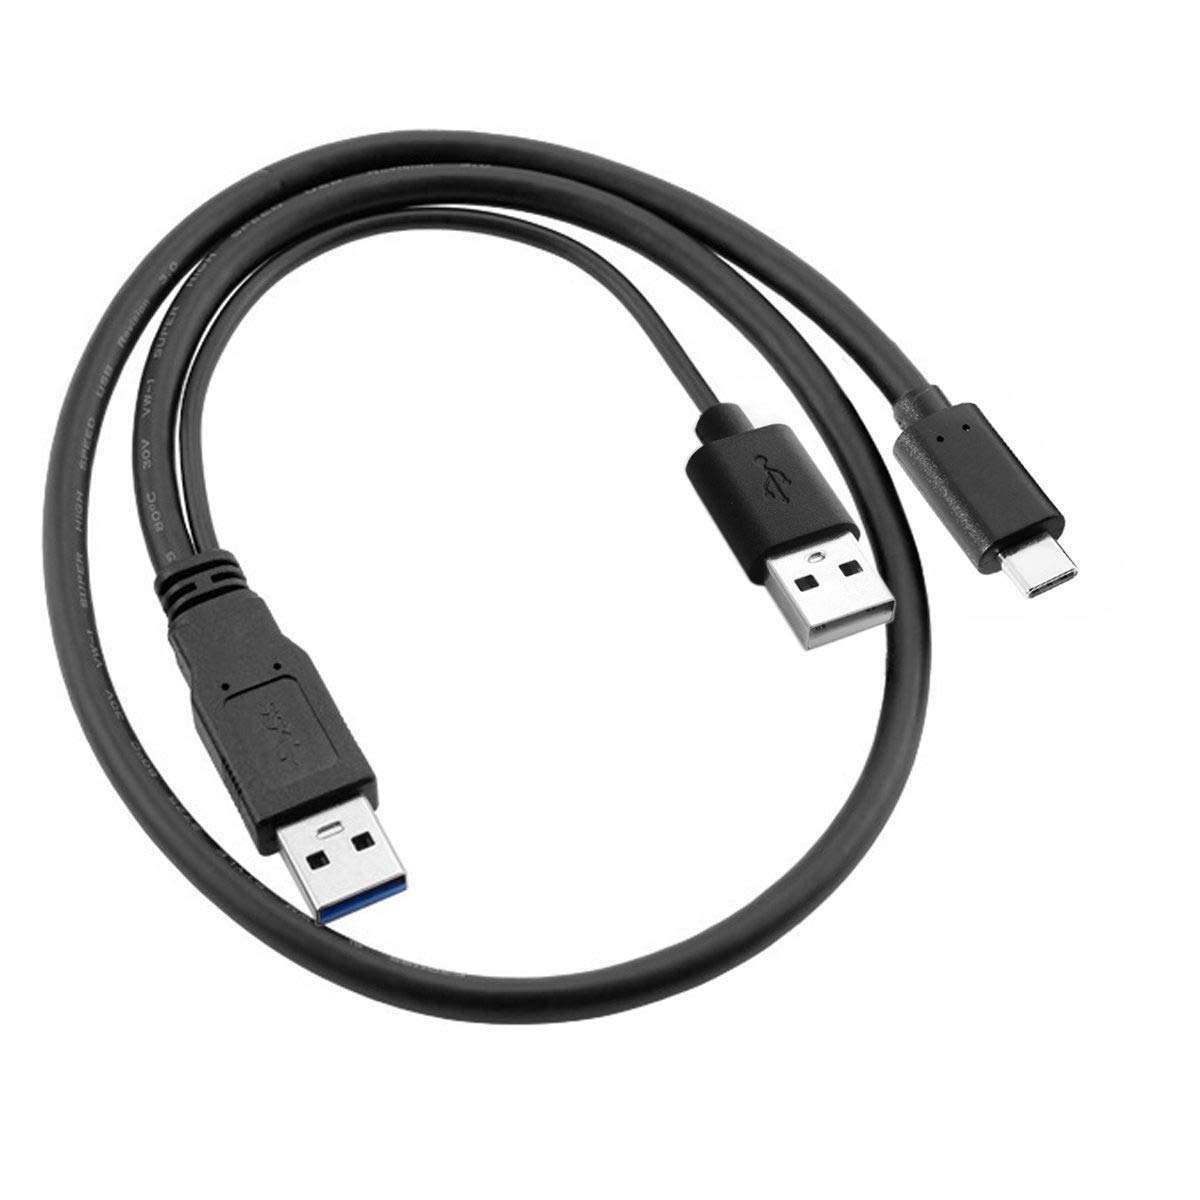
[C Splitter Dual (CP210x)](https://www.amazon.com/Cablecc-Type-C-USB-C-Power-Laptop/dp/B07VVX257H/ref=sr_1_1_pp?crid=1023POZXOBD5H&dib=eyJ2IjoiMSJ9.vC_z1K13EDIArR4bDN70N1dNcZrkJRQTIHwLSQvwYgFk3a_SXs52HCV0zMPOzZnPvHU3_tHiCr11XI4PJEcN-O5xEnGvZ3gY2ITc8omLOFV373DJ_J9f3zjK6IS85ihyHhImGk1QEmqC-JHvKDkTd_wlMRmYaf0IsdZUjBpZgHKgupKxBy_Yqm97Bnb0-vW9g-mDtZkA6e9DUcQOE5byMfFjkLqO9WxqjWXnk_WeUww.dvicPWvbyii2YXPwild8J2GNplxeY9hNkFY79hE6gJ4&dib_tag=se&keywords=usb%2BC%2Bsplit&qid=1781209057&sprefix=usb%2Bc%2Bspl%2Caps%2C277&sr=8-1&th=1)
[](https://skywiki.coffee/uploads/images/gallery/2026-06/DgGimage.png)
3. **Binary File Link**:
[SnowBear UART (Kaleido Tablet Top USB Port)](https://github.com/galangl/kaleido_sniper/blob/main/SnowBear/snowbear.bin)
[SnowBear USB CP210x (Artisan Bottom USB port)](https://github.com/galangl/kaleido_sniper/blob/main/SnowBear/BLE_host_v1.2z_Kaleido%20M1%20Lite.bin)
4. **Browser**:Use Google Chrome or Microsoft Edge (supports Web Serial)
[ESPHome](https://web.esphome.io/)
---
### **Steps**
#### **1. Download the Binary File**
1. Open the [GitHub link](https://github.com/galangl/kaleido_sniper/tree/main/SnowBear)
1. [Tablet UART Top Port](https://github.com/galangl/kaleido_sniper/blob/main/SnowBear/snowbear.bin)
2. [Artisan Bottom USB Port](https://github.com/galangl/kaleido_sniper/blob/main/SnowBear/BLE_host_v1.2z_Kaleido%20M1%20Lite.bin)
2. Click on the download raw file icon to download 
---
#### **2. Open ESPHome Web**
1. Go to [ESPHome Web](https://web.esphome.io/)
in your Chrome or Edge browser.
2. Make sure your ESP32-S3 is connected to your computer using a USB cable.
---
#### **3. Connect the ESP32-S3**
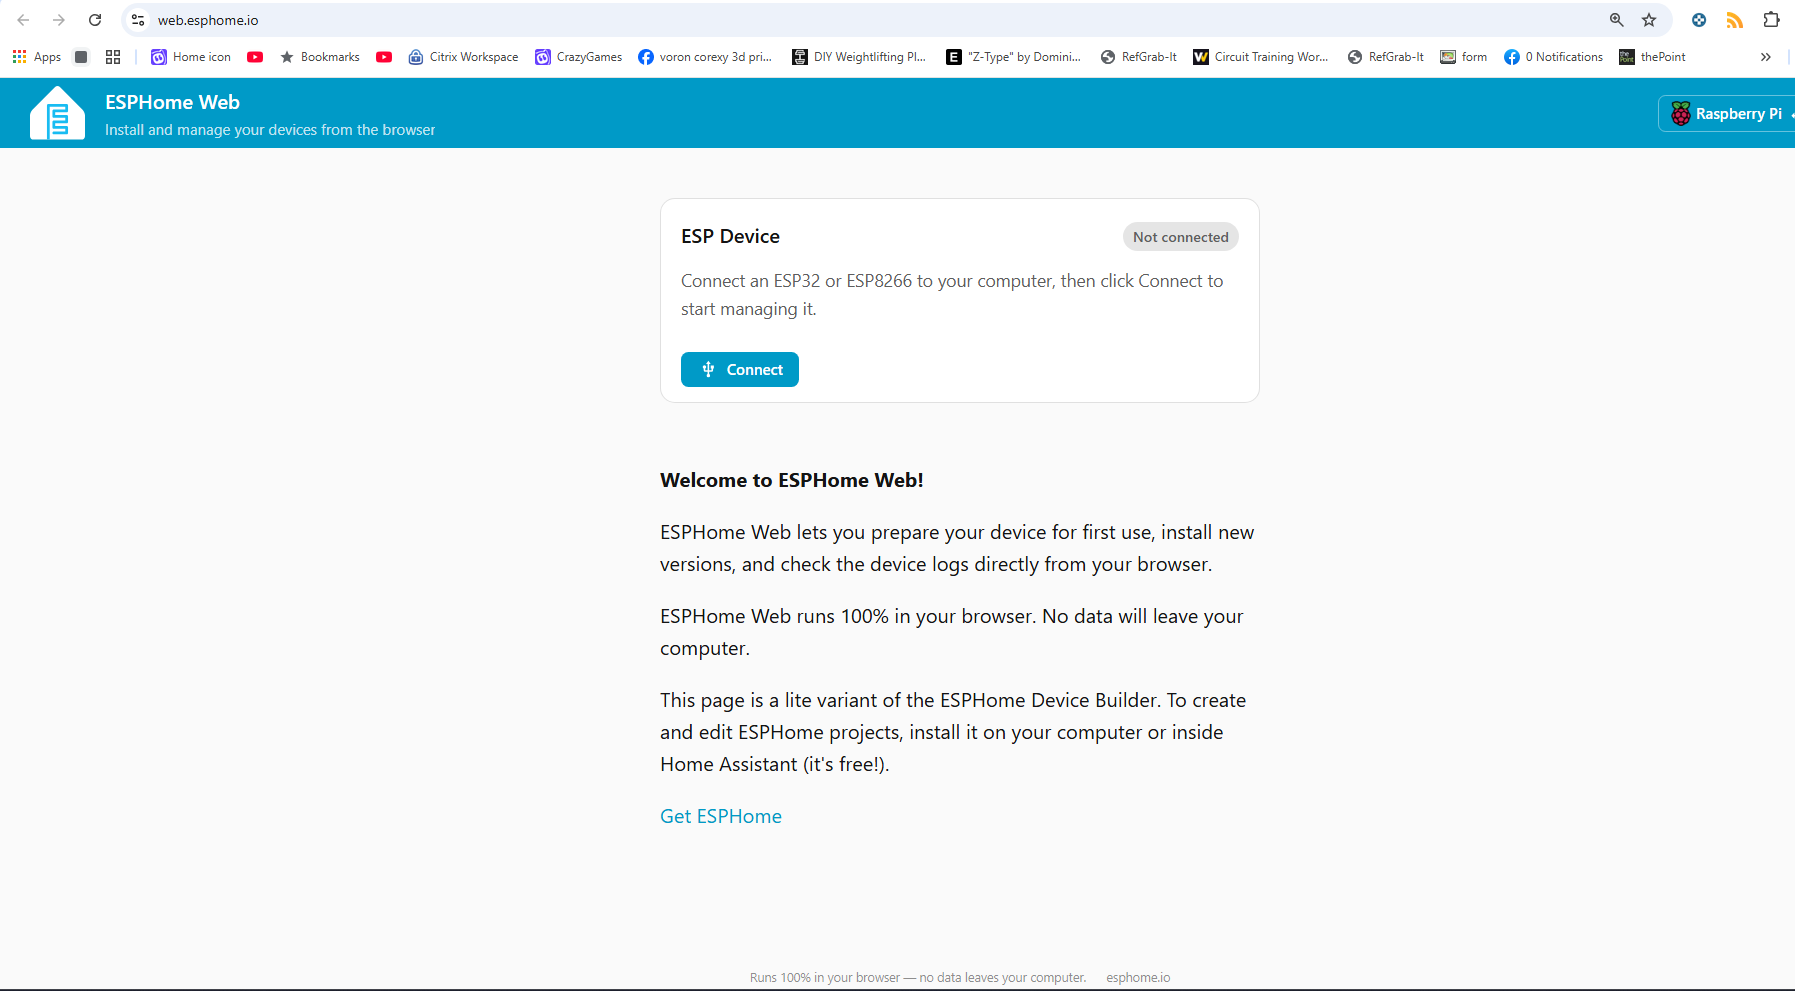
1. On the ESPHome Web page, click the **Connect** button.
[](https://skywiki.coffee/uploads/images/gallery/2026-09/image.png)
2. A pop-up will appear with available devices. Select the port for your ESP32-S3 and click **Connect**.
[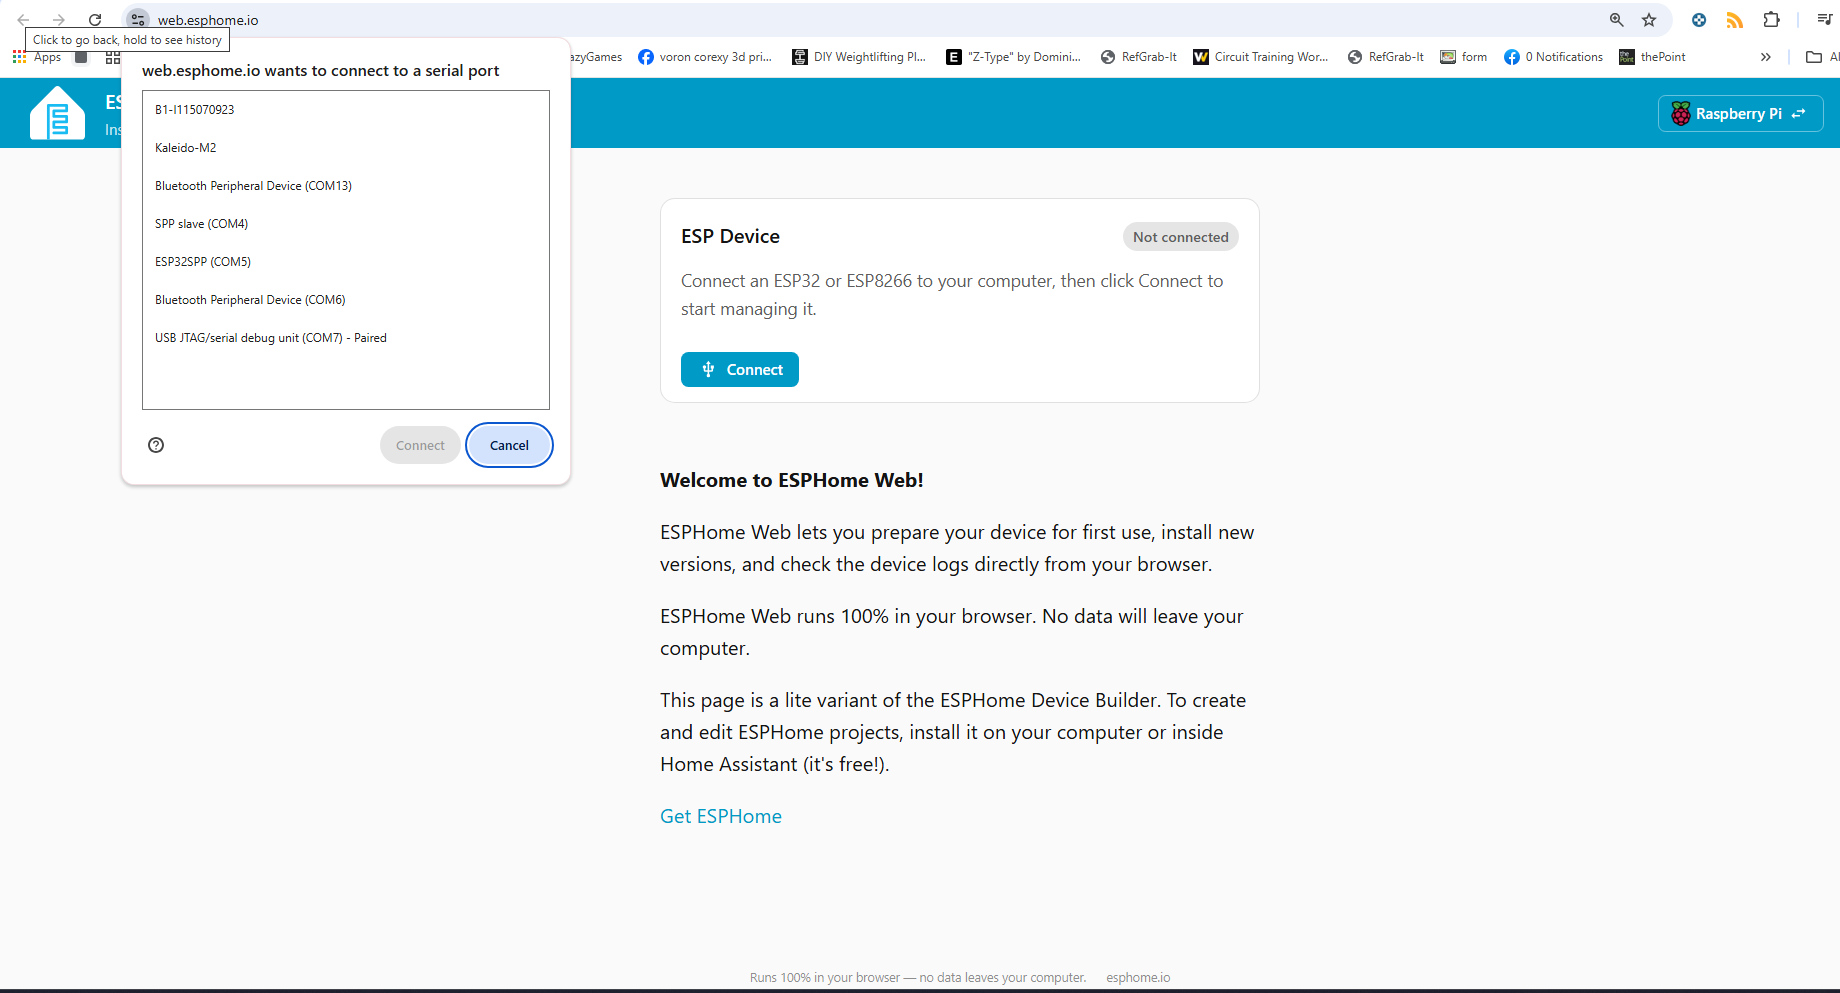](https://skywiki.coffee/uploads/images/gallery/2026-09/PmWimage.png)
---
#### **4. Install the Binary File**
1. Once connected, click **Install**.
[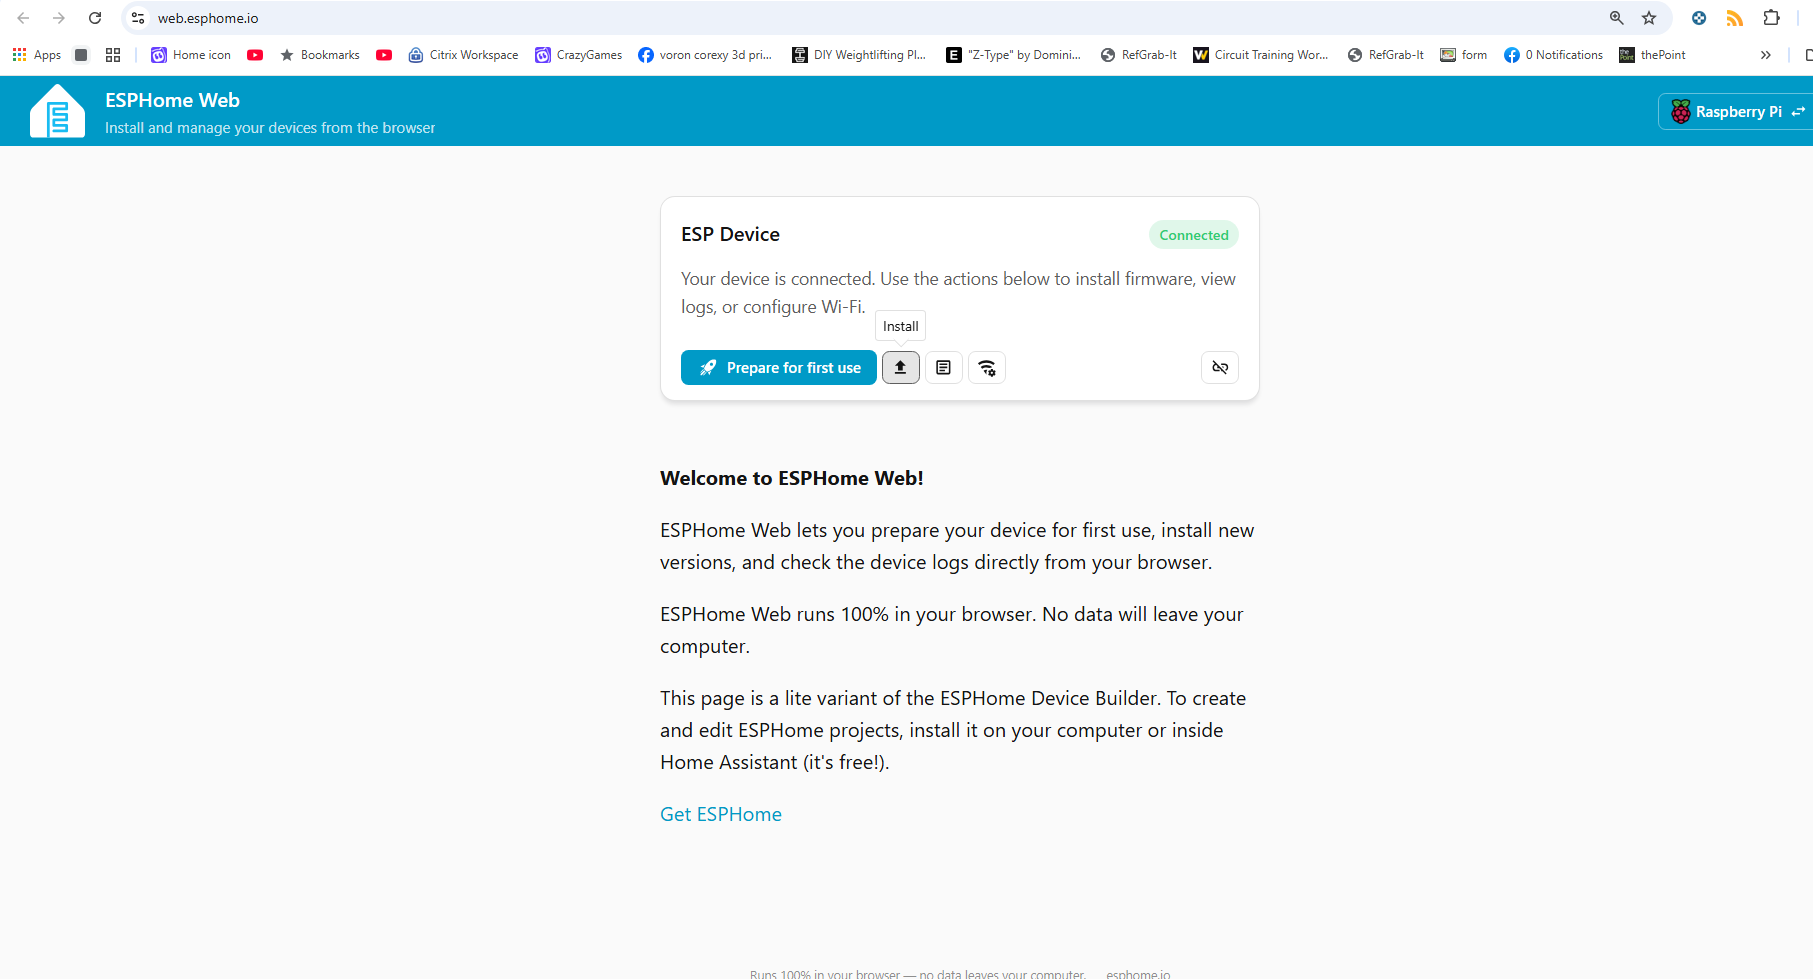](https://skywiki.coffee/uploads/images/gallery/2026-09/RHZimage.png)
2. Choose **File** when prompted
3. In the file selection dialog, locate and select the BLE\_host\_v1.2z\_Kaleido\_SnowBear.bin bin file you downloaded earlier.
[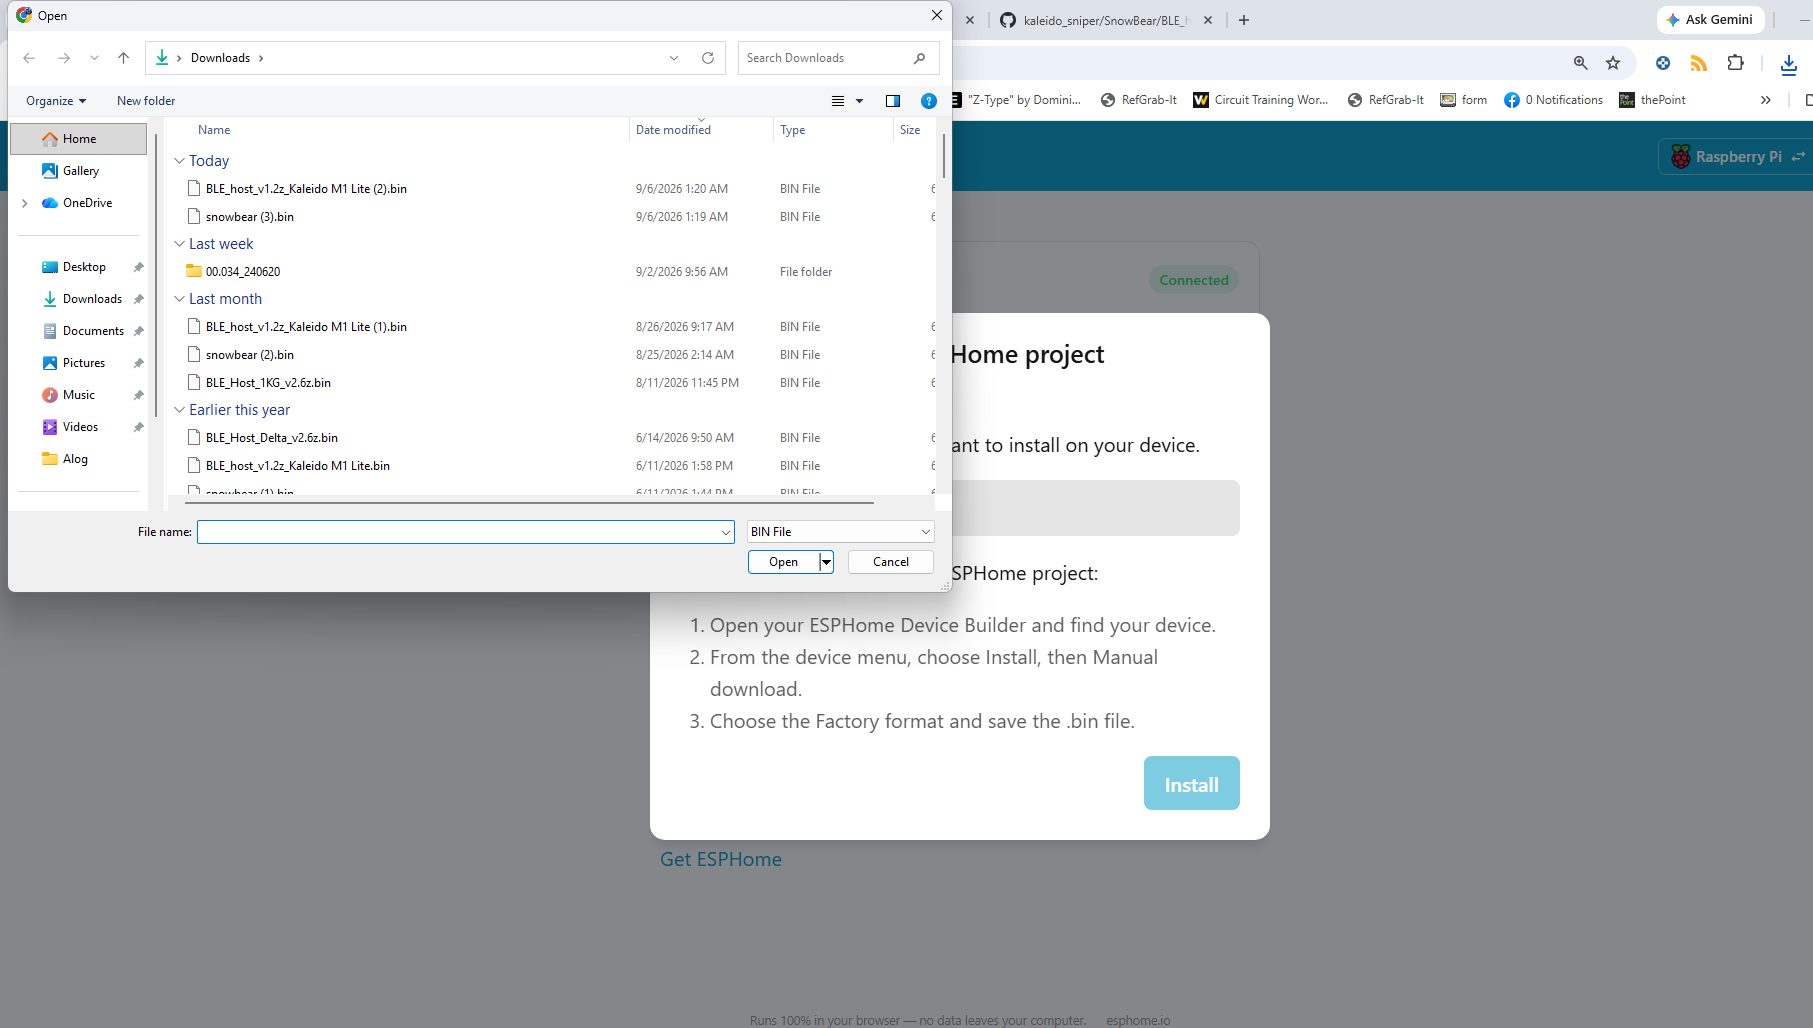](https://skywiki.coffee/uploads/images/gallery/2026-09/rjNimage.png)
4. Click **Install** to start the flashing process.
5. [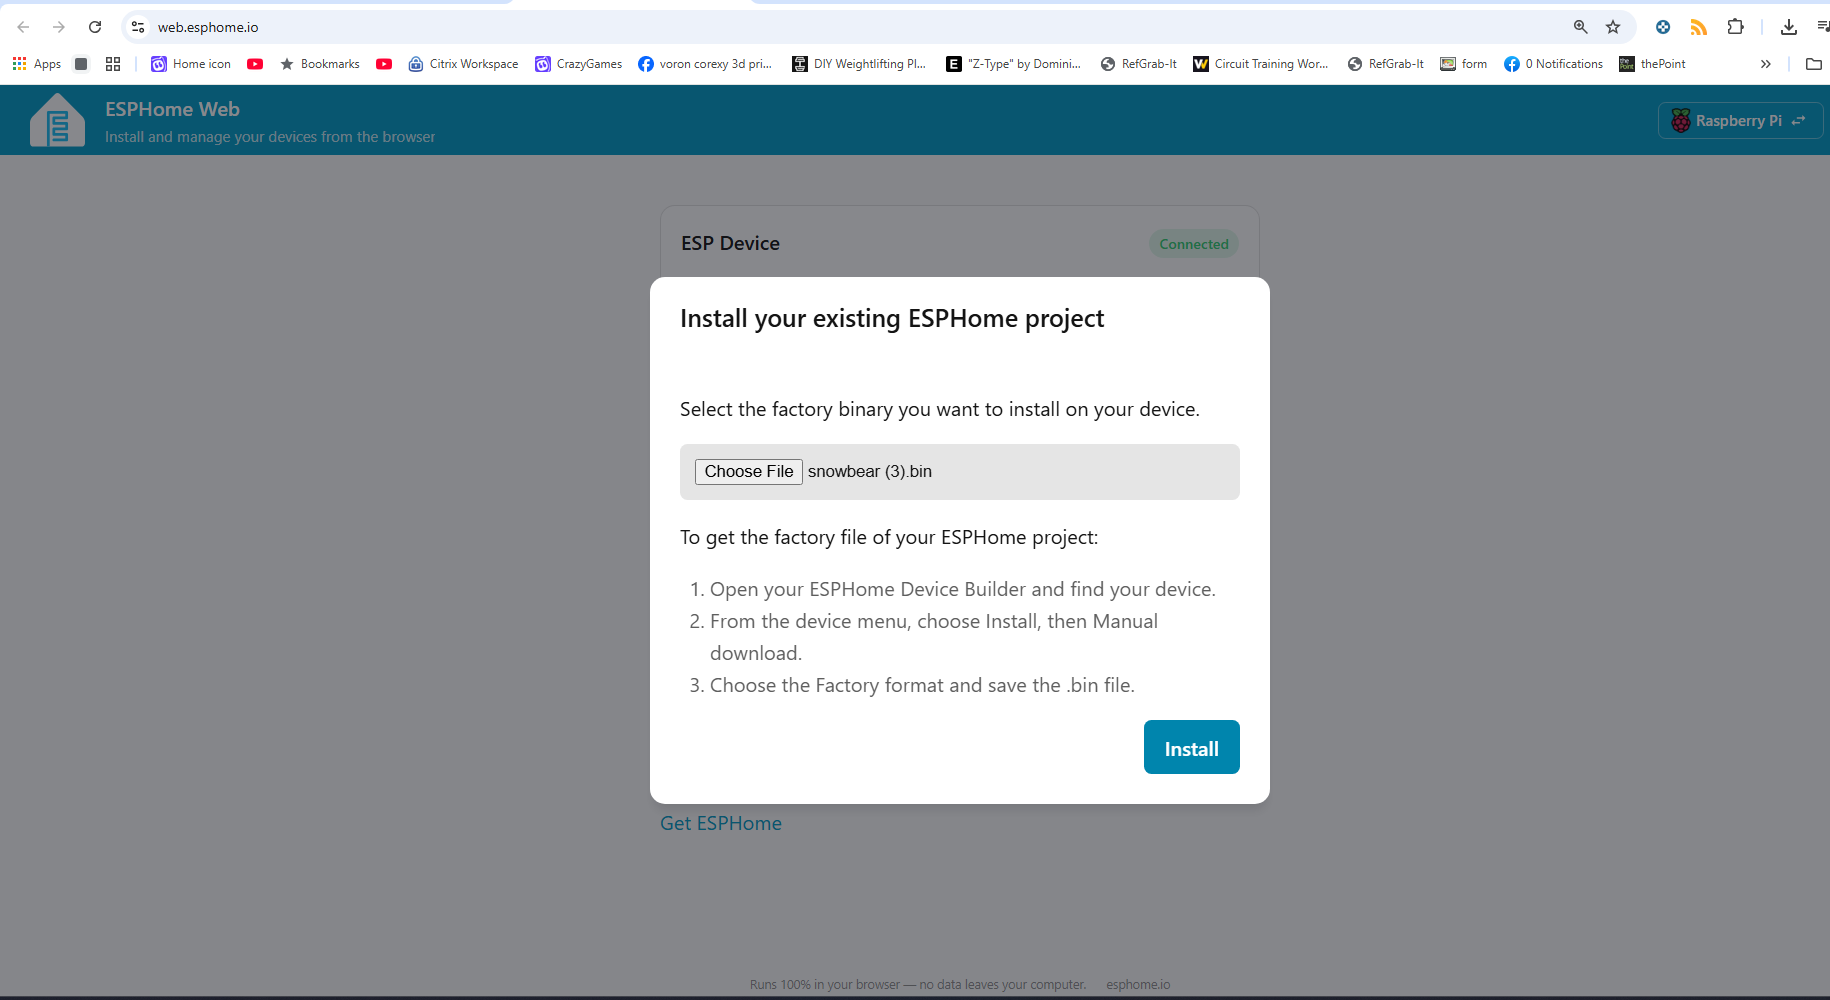](https://skywiki.coffee/uploads/images/gallery/2026-09/x5Fimage.png)
---
#### **5. Flash the Firmware**
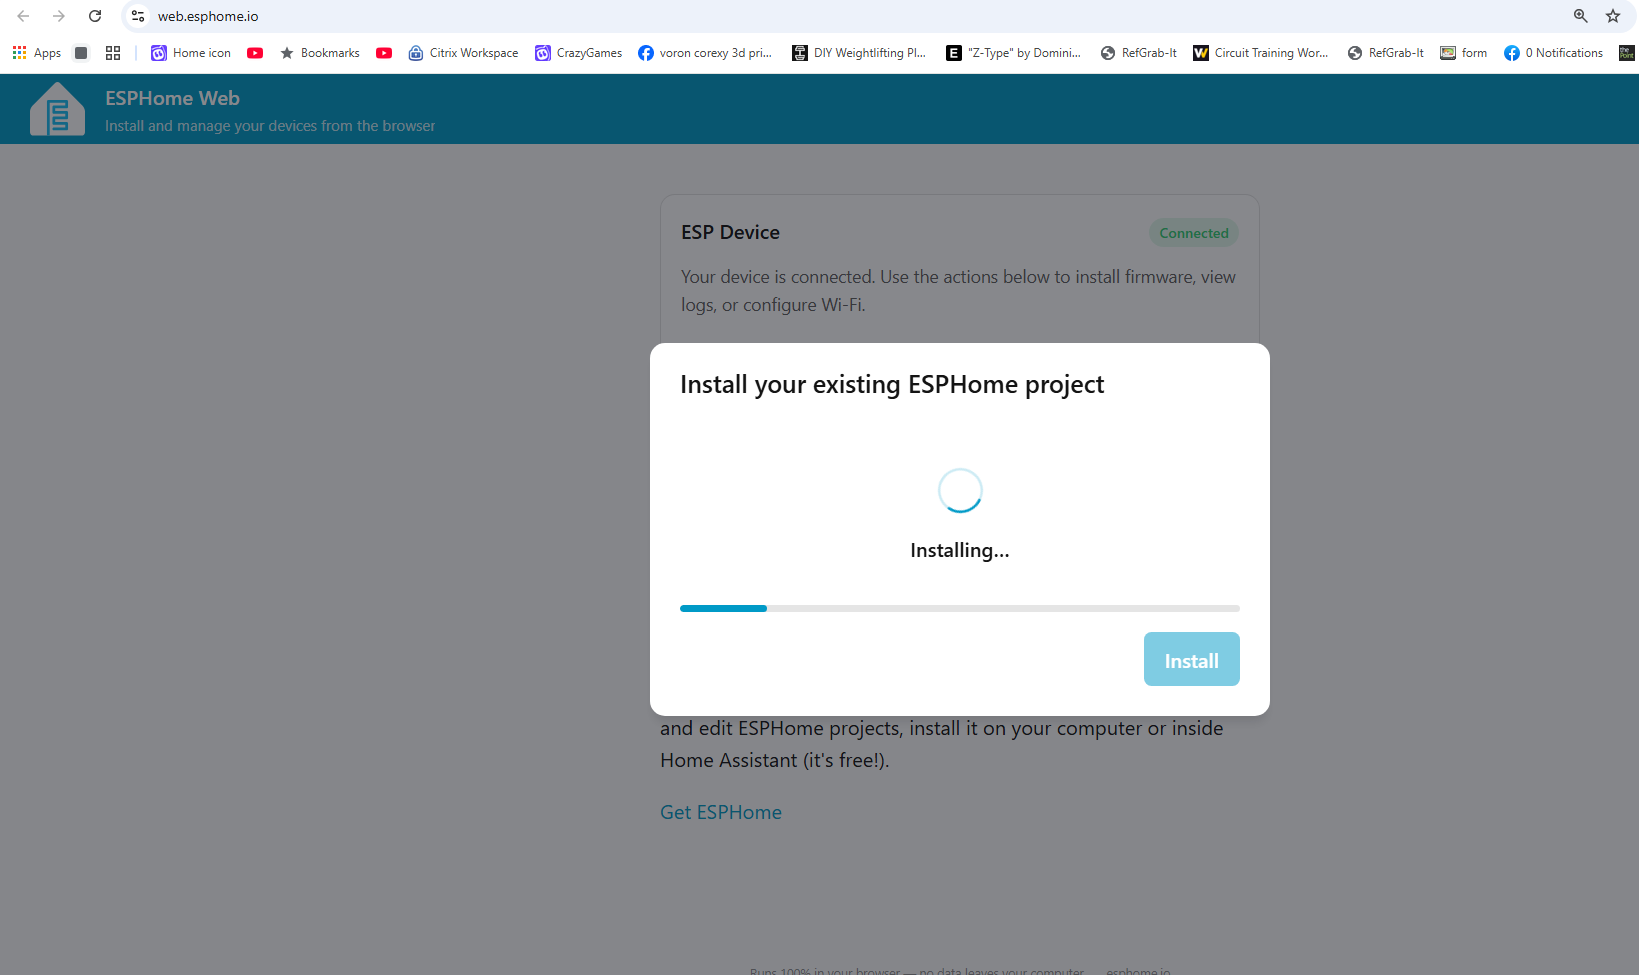
1. ESPHome Web will erase the existing firmware and flash the BLE\_host\_v1.2z\_Kaleido\_SnowBear.bin binary.
[](https://skywiki.coffee/uploads/images/gallery/2026-09/VJGimage.png)
2. The flashing process may take a few minutes. Wait for it to complete.
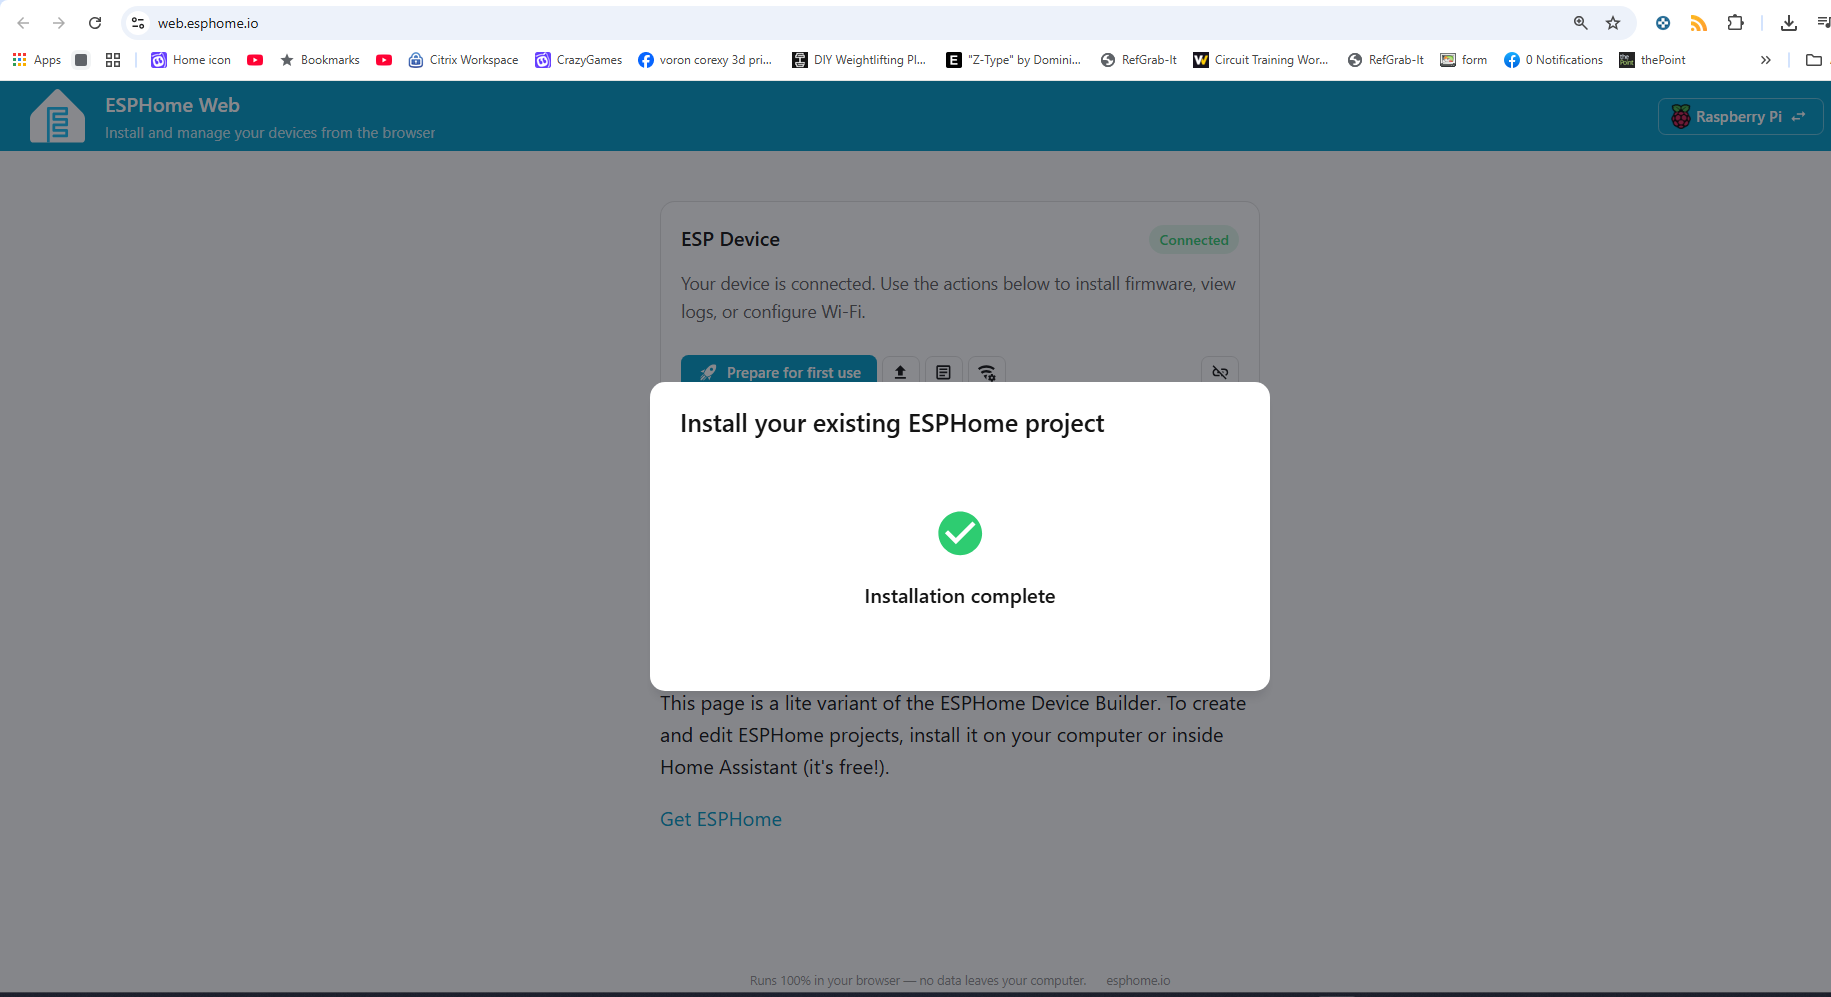
3. After successful installation, a success message will appear.
[](https://skywiki.coffee/uploads/images/gallery/2026-09/TNsimage.png)
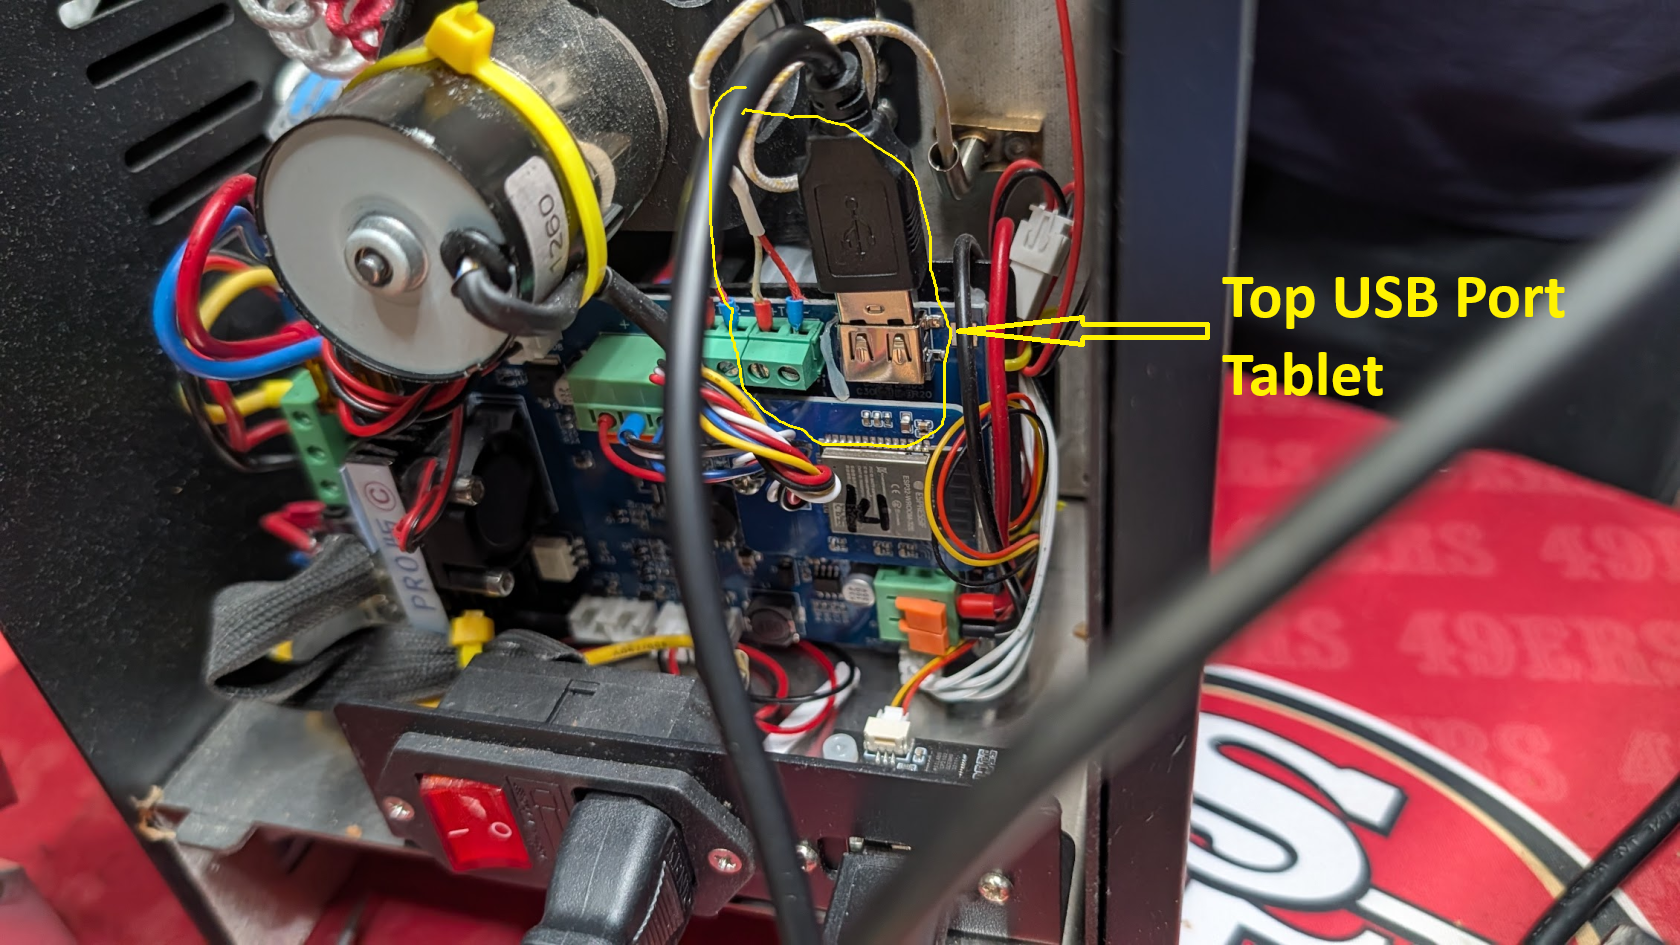
#### 6a. Plug into Kaleido Tablet USB Port. (Top USB (or JST-XH) port)
[](https://skywiki.coffee/uploads/images/gallery/2026-09/q1ktop.png)
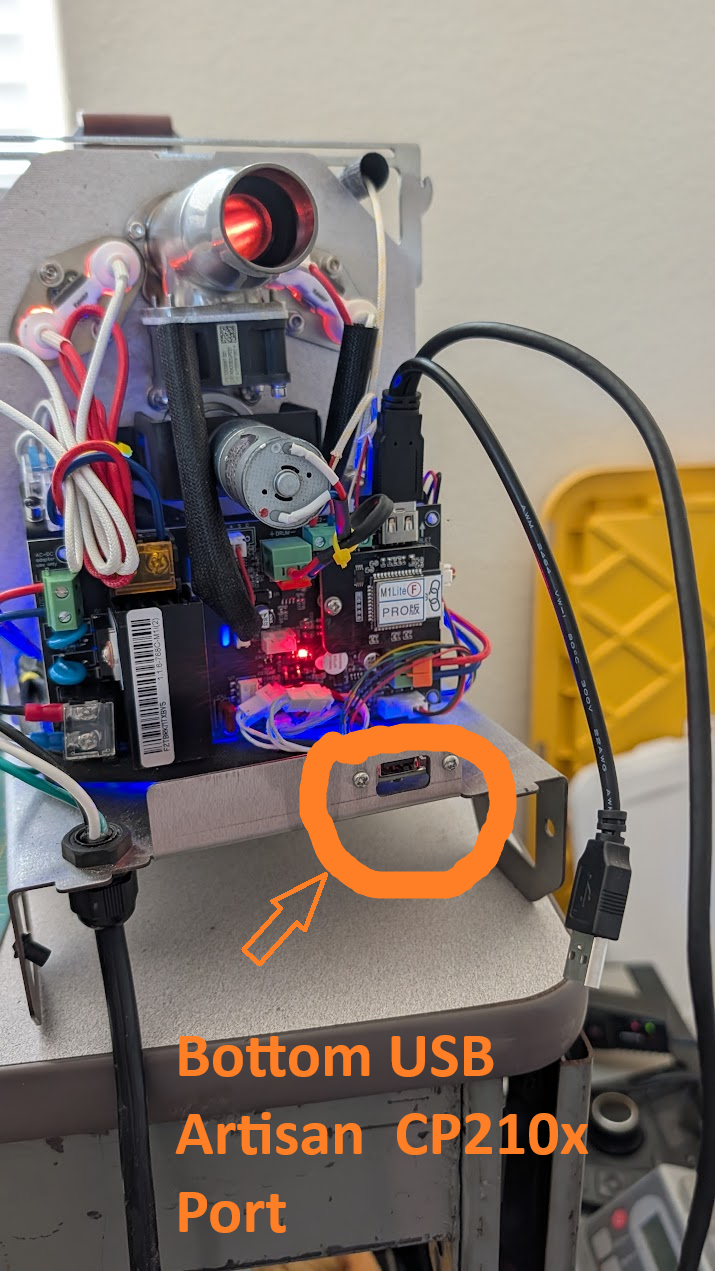
#### 6b. Plug into Artisan Tablet USB Port. (Bottom USB port not the bottom)
[](https://skywiki.coffee/uploads/images/gallery/2026-09/cp10x.png)
---
### **Direct Link to Binary File**
---
### **Troubleshooting**
- **Device Not Recognized**: Ensure your USB cable supports data transfer.
- **Flashing Errors**
- **Hold BOOT and press RESET (recommended method):**
1. Hold down the **BOOT** button.
2. While holding BOOT, press and release the **RESET** button.
3. Continue holding BOOT for a second, then release it.
1. 1. **Unplug and replug while holding the BOOT button:**
1. Disconnect the ESP32-S3 from power (USB).
2. Press and hold the **BOOT** button.
3. While holding BOOT, plug the USB back in.
4. Once connected, release the BOOT button.
- Let me know if you encounter issues or need further help!
- Not all wires are the same ensure your wire has Data Wires not a 2 strand charging wire.
BIG Thank you to Bear of the Skywalker Community Discord and Will\_Z for getting this option to work.
# Kaliedo Protocol Artisan USB
Kaliedo Roaster Protocol
Quick command reference for Artisan / HiBean serial control
# Format Conventions
Instruction stream uses {\[ as prefix and \]} as suffix.
Data stream uses { as prefix and } as suffix. Responses start with sid (status byte).
All keywords are uppercase. Each command is terminated with a newline (\\n).
Multiple commands can share one {\[ \]} pair, separated by commas — for example: {\[HP 80,FC 60,RC 90\]}
# Connection and Setup
| Command
| Description
|
|---|
| {\[PI\]}
| Ping — connection test. Returns {sid}.
|
| {\[SC AR\]}
| Start Artisan session. Returns {sid,SN:xxxxxxxx}.
|
| {\[SC CP\]}
| Start Cropster session. Returns {sid,SN:xxxxxxxx}.
|
| {\[CL AR\]}
| Close Artisan session.
|
| {\[CL CP\]}
| Close Cropster session.
|
| {\[TU C\]}
| Set temperature unit to Celsius.
|
| {\[TU F\]}
| Set temperature unit to Fahrenheit.
|
| Command
| Description
|
|---|
| {\[RD A0\]}
| Read main parameters (BT, ET, AT, HP, FC, RC, AH, TS).
|
| {\[RD A1\]}
| Read main parameters plus heating status (adds HS field).
|
| Command
| Description
|
|---|
| {\[HS 0\]}
| Stop heating.
|
| {\[HS 1\]}
| Start heating.
|
| {\[HP n\]}
| Set heater power n% (step 5, range 0-100).
|
| {\[HP UP\]}
| Step heater up by 5%.
|
| {\[HP DW\]}
| Step heater down by 5%.
|
| {\[TS n.n\]}
| Set target temperature (0-250 °C / 32-482 °F).
|
| {\[AH 0\]}
| Disable auto-heat (manual power mode).
|
| {\[AH 1\]}
| Enable auto-heat (device PID controls heat to TS).
|
| Command
| Description
|
|---|
| {\[FC n\]}
| Smoke fan n% (step 5, range 0-100).
|
| {\[FC UP\]}
| Step fan up by 5%.
|
| {\[FC DW\]}
| Step fan down by 5%.
|
| {\[RC n\]}
| Drum roll n% (step 10, range 0-100).
|
| {\[RC UP\]}
| Step drum up by 10%.
|
| {\[RC DW\]}
| Step drum down by 10%.
|
| Command
| Description
|
|---|
| {\[CS 0\]}
| Cooling off.
|
| {\[CS 1\]}
| Cooling on.
|
| Command
| Description
|
|---|
| {\[EV 1\]}
| Charge — beans loaded into drum.
|
| {\[EV 2\]}
| Temp Return (TP) — turning point.
|
| {\[EV 3\]}
| Dry End — end of drying phase.
|
| {\[EV 4\]}
| First Crack Start.
|
| {\[EV 5\]}
| First Crack End.
|
| {\[EV 6\]}
| Second Crack Start.
|
| {\[EV 7\]}
| Second Crack End.
|
| {\[EV 8\]}
| Drop — beans dropped to cooling tray.
|
| {\[EV 9\]}
| Cool End — cooling complete.
|
| Command
| Description
|
|---|
| 0000
| IDLE
|
| 0001
| CHARGE
|
| 0010
| TP (Turning Point)
|
| 0011
| DRY END
|
| 0100
| FC (First Crack)
|
| 0101
| FC END
|
| 0110
| SC (Second Crack)
|
| 0111
| SC END
|
| 1000
| DROP
|
| 1001
| COOL END
|
| Command
| Description
|
|---|
| {\[PI\]}
| Ping the roaster to verify connection.
|
| {\[TU C\]}
| Set the unit (C or F).
|
| {\[SC AR\]}
| Open an Artisan session — roaster returns its serial number.
|
| {\[RD A0\]}
| Poll for live data, repeated about every 1.5 seconds.
|
| {\[CL AR\]}
| Close the session when disconnecting.
|
| Digit | Value |
|---|
| 0 | `0x6B` |
| 1 | `0x4B` |
| 2 | `0x2B` |
| 3 | `0x0B` |
| 4 | `0x6F` |
| 5 | `0x4F` |
| 6 | `0x2F` |
| 7 | `0x0F` |
| 8 | `0x63` |
| 9 | `0x43` |
The resulting message is XORed with the current session key before being transmitted.
## Known Telemetry
The protocol provides access to several important roaster parameters:
- **BT** — Bean Temperature
- **ET** — Environmental Temperature
- **SV** — Temperature Set Value
- **Power** — Heater output
- **Smoke** — Exhaust/smoke fan
- **Drum** — Drum control
Telemetry fields are identified within decoded messages using `0x23` field separators.
## Known Controls
The reverse-engineered protocol allows control of:
- Heater power: **0–100%**
- Exhaust/smoke fan: **0–100%**
- Drum: **0–100%**
- Temperature setpoint
- Heating mode
- Cooling system ON/OFF
The reference implementation translates Artisan-style commands such as `OT1`, `OT2`, `IO3`, `SV`, and `CLDN` into the corresponding Kaleido UART messages.
## Bridge Architecture
A typical implementation is:
**Artisan / Application → ESP32 → Kaleido UART Protocol → Roaster**
The ESP32 acts as a protocol bridge, receiving easy-to-use commands from software, translating them into Kaleido messages, applying the session XOR encoding, and transmitting them to the roaster.
This makes it possible to integrate Kaleido roasters with custom controllers, roasting software, alternative Bluetooth interfaces, and other community-developed hardware without relying exclusively on the original control interface.
## Current Status
The protocol has been sufficiently reverse engineered to:
- Read BT and ET
- Read current heater, fan, drum, and SV values
- Set heater power
- Set exhaust/smoke fan
- Control drum output
- Set temperature SV
- Start/stop cooling
- Emulate portions of the original Kaleido controller communication
- Interface the roaster with external roasting software
Further protocol analysis may reveal additional commands, operating states, alarms, configuration parameters, and model-specific differences.